Download FastCopy — The Fastest File Copier for Windows
Transfer files at maximum disk speed with multi-threaded I/O, hash verification, and zero external dependencies. Trusted by millions since 2004.
What Is FastCopy?
A deep look at the file transfer tool that outperforms Windows Explorer by 2-3x on large operations.
FastCopy is a free file copy, move, and backup utility built specifically for Windows. Developed by Japanese programmer Shirouzu Hiroaki and maintained since 2004, it handles large file transfers significantly faster than the built-in Windows copy handler. The current release, version 5.11.2, supports every Windows version from 7 through 11, including both 32-bit and 64-bit editions.
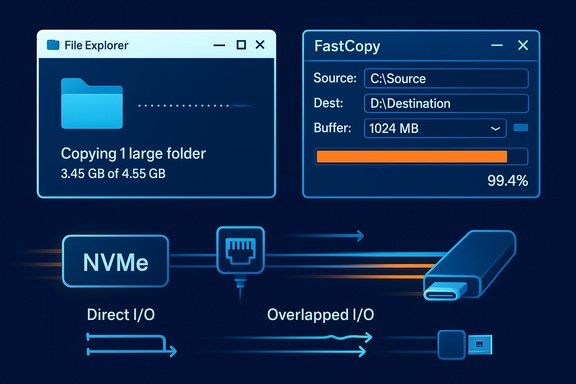
The program achieves its speed advantage through a direct approach to disk I/O. Instead of relying on the Windows cache manager (which adds overhead), FastCopy reads and writes data using its own memory buffer and overlapped I/O calls. It sends multiple read and write requests to the disk simultaneously, keeping the drive’s command queue full at all times. On modern NVMe drives, this technique can push transfer speeds above 500 MB/s for sustained operations.
Who Uses FastCopy?
System administrators rely on FastCopy for server migrations and daily backup scripts. Photographers and video editors use it to move terabytes of raw footage between drives without corruption risk. IT departments in enterprise environments deploy it across workstations for standardized file management. Home users pick it up when they realize Windows Explorer stalls or slows down on folders containing thousands of small files.
FastCopy won the 2015 “WindowsForest Grand Prize” from Impress, one of Japan’s largest tech publications. The award recognized it as the most useful free Windows utility of that year.
How It Compares to Windows Explorer
The default Windows copy dialog processes files one at a time and relies heavily on the OS file cache. For small transfers this works fine, but once you start moving 10,000+ files or anything over 50 GB, the difference becomes obvious. FastCopy benchmarks from the official site show throughput roughly 2-3 times faster than Explorer on the same hardware. It also handles error recovery better – if a single file fails, FastCopy logs the error and continues rather than stopping the entire batch.
Portable and Lightweight
The entire application weighs about 5 MB and has no external dependencies. There is no .NET Framework requirement, no Visual C++ redistributable, and no installer bloat. You can run FastCopy in portable mode from a USB drive without installing anything on the host machine. This makes it a go-to tool for IT professionals who carry a toolkit thumb drive between client sites.
Key Features
Everything FastCopy packs into a 5 MB download – from raw speed to data integrity verification.
Multi-Threaded I/O Engine
FastCopy sends overlapping read and write requests directly to disk controllers, bypassing the Windows file cache. This keeps NVMe and SSD command queues saturated, reaching 500+ MB/s on capable hardware. The difference is most visible on large batches of small files where Explorer grinds to a halt.
SHA-256 / xxHash Verification
After copying, FastCopy can verify every byte by computing SHA-256 or xxHash checksums on both source and destination. This catches silent data corruption, bit-rot, and drive errors that would otherwise go unnoticed. The verification runs in parallel with the copy process, so it adds minimal extra time.
Differential Copy and Sync
The “Diff” mode compares file size and modification date to skip unchanged files. Full sync mode goes further: it mirrors the source to the destination and deletes files at the target that no longer exist at the source. Both modes save hours on recurring backup jobs.
Command-Line Interface
Every GUI option has an equivalent command-line flag. You can schedule FastCopy via Windows Task Scheduler, call it from batch scripts, or integrate it into PowerShell workflows. Common flags include /cmd=diff for differential copy, /verify for hash verification, and /log for logging output.
Include/Exclude Filtering
UNIX-style wildcard filters let you target specific file types or skip unwanted directories. For example, *.jpg;*.png copies only image files, while /exclude=node_modules skips heavy dependency folders. Filters apply to both file names and directory paths.
Long Path and UNICODE Support
Windows has a notorious 260-character path limit (MAX_PATH). FastCopy bypasses this entirely, handling paths up to 32,767 characters. It also processes UNICODE file names correctly, so Japanese, Chinese, Korean, and emoji characters in file names copy without corruption.
ACL and ADS Preservation
NTFS file permissions (Access Control Lists) and Alternate Data Streams are preserved during copy and move operations. This matters for enterprise deployments where file ownership and security metadata must remain intact after migration.
Shell Context Menu Integration
Right-click any file or folder in Windows Explorer to access FastCopy directly from the context menu. You can set up default copy, move, or delete operations that trigger FastCopy instead of the standard Windows handler. Works with both legacy and Windows 11 context menus.
CPU Affinity Control
You can pin FastCopy to specific CPU cores, freeing other cores for your work. On a 12-core workstation, you might dedicate cores 10-11 to FastCopy while keeping the rest available for video editing or compiling. This level of control is rare in file copy utilities.
Secure Delete (Wipe)
The delete mode can overwrite file data before removal, preventing recovery with forensic tools. Useful for decommissioning drives that contained sensitive information. You can choose single-pass or multi-pass overwrite depending on your security requirements.
Portable Mode
FastCopy runs directly from a USB drive or any folder without installation. No registry entries, no system files, no traces left behind. IT professionals carry it on their toolkit drive for on-site troubleshooting and data recovery jobs.
Real-Time Transfer Statistics
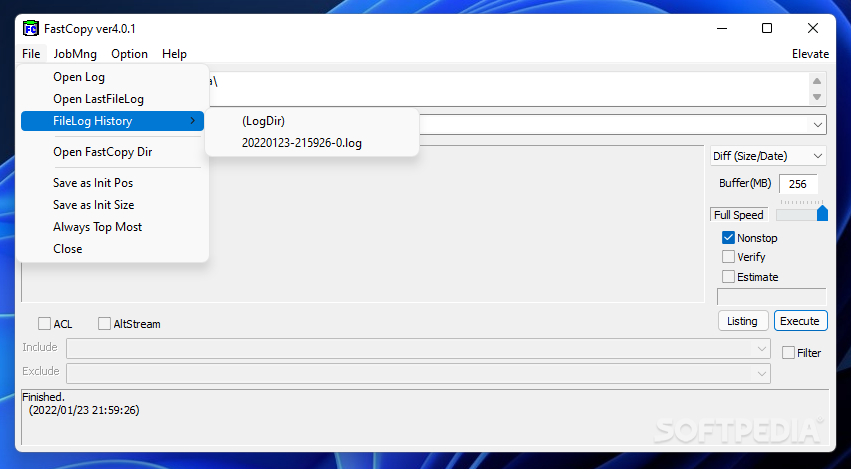
The progress window shows live transfer speed, files per second, elapsed time, and ETA. After completion, a detailed log lists every file processed, any errors encountered, and total throughput. The log can be exported for audit trails or troubleshooting.
System Requirements
FastCopy runs on virtually any Windows machine – here are the specifics.
| Component | Minimum | Recommended |
|---|---|---|
| Operating System | Windows 7 (32-bit or 64-bit) | Windows 10/11 (64-bit) |
| Processor | Any x86/x64 CPU | Dual-core 1 GHz or faster |
| RAM | 64 MB | 128 MB or more |
| Disk Space | 10 MB | 10 MB |
| Display | 800 x 600 | 1024 x 768 or higher |
| Dependencies | None | None (no .NET, no runtimes) |
| Server Support | Windows Server 2012 | Windows Server 2019/2022 |
FastCopy v5.11.2 has been tested on Windows 11 24H2. Both installer and portable editions share the same requirements.
Download FastCopy 5.11.2
Get the latest version directly from the official source. Free for personal use.
Latest Stable Release — December 10, 2025
FastCopy v5.11.2 for Windows
FastCopy is also available as a Pro edition for workplace and enterprise use, with enhanced verification and reporting features. Visit fastcopy.jp for details.
Screenshots
See FastCopy in action – from the main interface to transfer progress and settings.
Getting Started with FastCopy
From download to your first file transfer in under five minutes.
Downloading FastCopy
Head to the download section on this page to grab the latest FastCopy 5.11.2 release. You have four download options to choose from:
- 64-bit Installer (5 MB) – the standard choice for most Windows 10/11 users. Includes shell integration setup and Start Menu shortcut creation.
- 32-bit Installer – only needed if you are running a 32-bit version of Windows (uncommon on modern hardware).
- 64-bit Portable (.zip) – extract anywhere and run. No installation, no registry changes. Best if you want to carry FastCopy on a USB drive.
- 32-bit Portable (.zip) – same as above, but for 32-bit systems.
If you are unsure which to pick, go with the 64-bit Installer. The download is about 5 MB and finishes in seconds on any connection. The installer does not bundle any third-party software, toolbars, or adware.
Installation Walkthrough
For the Installer (.exe):
Run FastCopy5.11.2_installer.exe after downloading. If Windows SmartScreen pops up with “Windows protected your PC,” click More info, then Run anyway. This warning appears because FastCopy is not signed with an EV code signing certificate – it is safe to proceed.
The installer window gives you these options:
- Install directory – defaults to
C:\Program Files\FastCopy. Leave this as-is unless you have a reason to change it. - Shell Extension – check this box to add FastCopy to the Windows right-click context menu. Strongly recommended.
- Desktop shortcut – optional. Useful if you launch FastCopy frequently from the desktop.
Click Install and wait about 3 seconds. That is it – no multi-step wizard, no license agreement to scroll through, no restart required.
For the Portable version (.zip):
Extract the .zip file to any folder. For example, D:\Tools\FastCopy\ or your USB drive at E:\FastCopy\. Run FastCopy.exe directly. To add shell integration manually from portable mode, open FastCopy, go to Help > Shell Extension Install.
Initial Setup and Configuration
On first launch, FastCopy opens its main window with two fields: Source and DestDir. Before your first copy job, take a minute to configure the settings that matter most.
Settings to check immediately (Edit > Settings):
- Buffer Size – defaults to 256 MB. For systems with 8+ GB of RAM, increase this to 512 MB or 1024 MB. Larger buffers improve throughput on big file operations.
- I/O Mode – leave on “Auto” unless you are copying between two physical drives on the same SATA controller, in which case “Non-Buffer” avoids cache contention.
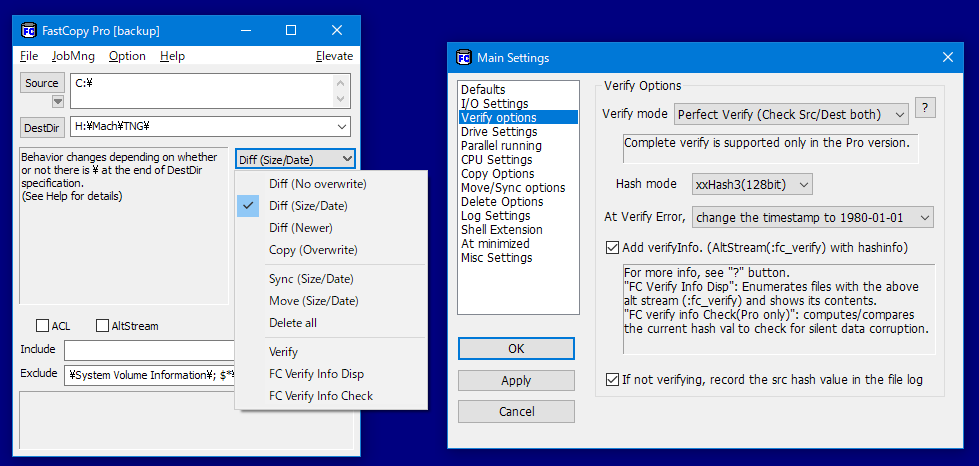
- Verify Option – under the main window dropdown, change from “Copy (no verify)” to “Copy (verify)” or “Diff (size/date)” depending on your use case.
- Log File – in Edit > Settings, enable “Log file” and choose a location. This creates a text log of every transfer for troubleshooting and record-keeping.
Copy mode options (dropdown in main window):
- Diff (no overwrite) – copies only files that do not exist at the destination.
- Diff (size/date) – copies files that are different in size or modification date. Best for incremental backups.
- Copy (overwrite all) – copies everything regardless. Use for fresh transfers.
- Sync (size/date) – mirrors source to destination, deleting extras at the target.
- Move (overwrite all) – copies files then deletes the originals.
- Delete – deletes the source files/folders (with optional secure wipe).
Your First File Transfer
Let’s copy a folder as a practical example. Say you want to back up D:\Photos\2025 to an external drive at E:\Backup\Photos.
- Click the Source browse button (…) and select
D:\Photos\2025. - Click the DestDir browse button and select
E:\Backup\Photos. - Set the mode dropdown to Diff (size/date) – this way, if you run the same job tomorrow, it only copies new or changed photos.
- Check the Verify checkbox to enable post-copy hash verification.
- Click Execute.
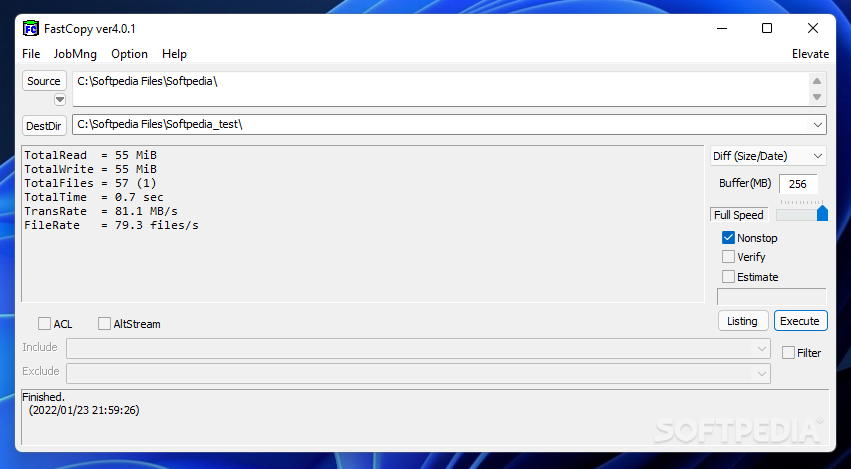
The progress panel appears immediately, showing real-time speed, file count, total size transferred, and an ETA. FastCopy uses a direct memory buffer, so you will typically see speeds 2-3x faster than dragging the same folder in Explorer.
When the transfer completes, the status bar shows “Finished” with a count of files transferred, errors (if any), and total elapsed time. If verification was enabled, you will see “Verify OK” confirming data integrity.
Using the command line instead:
This command performs a differential copy with verification and closes the window automatically when done. Add /log to write a log file.
Tips, Tricks, and Best Practices
Speed optimization: Copy between two separate physical drives rather than two partitions on the same drive. NVMe-to-NVMe transfers on separate drives can hit 1+ GB/s. Increase the buffer size to 1024 MB on machines with 16+ GB of RAM.
Scheduled backups: Use Windows Task Scheduler to run FastCopy’s command-line mode at specific times. A nightly backup script using /cmd=sync keeps your backup drive mirrored to your working drive with zero manual effort.
Common mistakes to avoid:
- Do not use “Sync” mode unless you want files at the destination that do not exist at the source to be deleted.
- Avoid copying to the same physical drive – it forces the disk head to seek between read and write positions, cutting speed in half.
- If you are copying across a network, make sure your network speed is not the bottleneck. A 1 Gbps Ethernet link caps at roughly 125 MB/s regardless of FastCopy’s speed.
Power-user features most people miss:
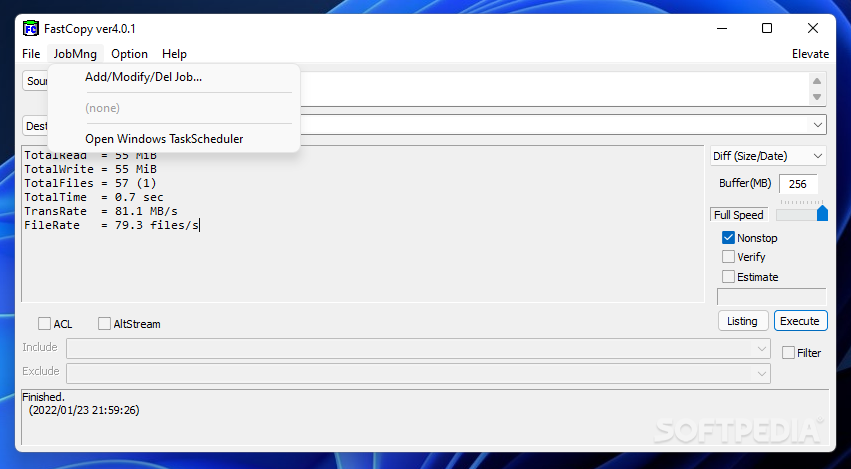
- Job Management (Edit > Job) – save frequently-used source/destination/mode combinations as named jobs. One click runs the whole preset.
- Post-Process – configure FastCopy to shut down the PC, hibernate, or run a custom script after a transfer completes.
- Listing Mode – click “Listing” to preview which files would be affected before actually executing the operation.
Where to get help: The official documentation is at fastcopy.jp/help. For community discussions, search for FastCopy threads on Reddit r/DataHoarder and r/sysadmin.
Ready to get started? Download FastCopy 5.11.2 and run your first transfer.
Frequently Asked Questions
Answers to the most common questions about FastCopy, from safety and setup to advanced usage and troubleshooting.
Is FastCopy free to download and use?
Yes, FastCopy is completely free for personal use with no trial period, no feature limitations, and no advertisements built into the software. Every core feature is available in the free edition, including differential copy, SHA-256/xxHash hash verification, multi-threaded I/O, command-line automation, UNICODE long path support, and shell extension integration.
The developer, Shirouzu Hiroaki, also offers a separate FastCopy Pro edition designed for workplace and commercial environments. The Pro version costs approximately 1,980 JPY (around $13 USD) and adds:
- Enhanced verification with exportable SHA-256 hash reports in CSV/text format for audit compliance
- Silent data corruption detection (bit-rot detection) for aging drives
- A commercial-use license suitable for enterprise deployment
- Priority email support from the developer
For home users, students, and personal backup needs, the free edition has everything you need. You can download the latest version (5.11.2) from our download section.
Is FastCopy safe for Windows 10 and Windows 11?
FastCopy is safe to install and run on both Windows 10 and Windows 11. The software has been in active development since 2004 by Shirouzu Hiroaki, and version 5.11.2 includes specific compatibility updates for Windows 11 24H2.
Why FastCopy is safe:
- No system file modifications: FastCopy does not alter Windows system files, registry entries (in portable mode), or protected OS components
- No admin privileges required: Standard file copy operations work without administrator elevation. Admin rights are only needed when copying to system-protected directories like
C:\Program Files - No telemetry or phone-home: FastCopy makes zero network connections. It does not collect usage data, send crash reports, or contact any remote server
- No bundled software: The installer contains only FastCopy. There are no toolbars, browser extensions, or third-party offers bundled with the download
- Source code available: The developer publishes the source code on fastcopy.jp for transparency and independent review
FastCopy has been reviewed and verified as clean by Softpedia (100% Free award), MajorGeeks, and AlternativeTo. If Windows SmartScreen shows a warning during installation, this is a generic alert for less common software and does not indicate a security issue. Click “More info” and then “Run anyway” to proceed.
Is FastCopy faster than Windows Explorer copy?
Yes, FastCopy is significantly faster than the built-in Windows Explorer file copy handler. In benchmark tests published on the official FastCopy website, the software achieves 2x to 3x faster throughput compared to Windows Explorer on identical hardware.
How FastCopy achieves higher speeds:
- Multi-threaded overlapped I/O: FastCopy reads and writes data simultaneously using multiple threads, keeping the storage device busy at all times. Windows Explorer processes files more sequentially.
- Direct memory-mapped transfers: FastCopy bypasses the Windows file cache layer and manages its own memory buffer (configurable from 64 MB to 1 GB+). This eliminates double-caching overhead that slows Explorer down.
- Optimized for small files: The performance gap is largest when copying thousands of small files. Explorer opens, reads, writes, and closes each file individually. FastCopy batches operations to minimize per-file overhead.
- CPU affinity control: FastCopy can lock operations to specific CPU cores, reducing context switching on multi-core processors.
Real-world example: Copying 50,000 small files (documents, configs, logs) totaling 15 GB might take Windows Explorer 18-22 minutes. FastCopy typically completes the same job in 6-8 minutes on the same hardware. For large single files (like a 50 GB disk image), the gap narrows but FastCopy still wins because it avoids the OS cache overhead.
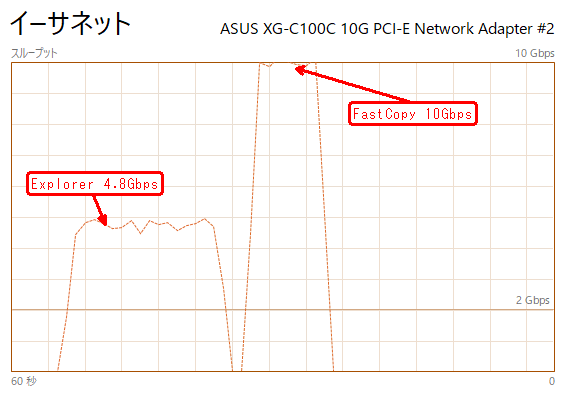
On 10 Gbps network connections, official benchmarks show FastCopy achieving close to 10 Gbps throughput while Windows Explorer tops out around 4.8 Gbps on the same NIC.
What are the system requirements for FastCopy?
FastCopy has extremely low system requirements and runs on virtually any Windows machine built in the last 15 years:
- Operating System: Windows 7, 8, 8.1, 10, or 11 (both 32-bit and 64-bit). Also supports Windows Server 2012, 2016, 2019, and 2022.
- Processor: Any x86 or x64 CPU. There is no minimum clock speed requirement.
- RAM: 64 MB minimum (128 MB recommended). FastCopy uses its own configurable buffer, so more system RAM allows larger buffer sizes for faster transfers.
- Disk Space: 10 MB for the full installation. The portable version uses even less.
- GPU: Not required. FastCopy is a CPU and disk I/O tool with no GPU acceleration.
- Dependencies: None. FastCopy has zero external dependencies. No .NET Framework, no Visual C++ Redistributable, no Java, and no other runtime. It runs as a standalone native Windows application.
The lack of dependencies is a key advantage for IT professionals. You can carry FastCopy on a USB drive and run it on any Windows machine without installing anything first. This makes it ideal for data recovery, field work, and troubleshooting scenarios where you cannot install software on the target system.
Does FastCopy verify files after copying?
Yes, FastCopy has built-in post-copy verification that confirms every byte of data was copied correctly. This feature is critical for anyone who needs to guarantee data integrity, especially when transferring important files, backups, or archival data.
How verification works:
- FastCopy reads the source file and computes a cryptographic hash (SHA-256 by default, or xxHash for faster checking)
- After the file is written to the destination, FastCopy reads the destination copy and computes its hash
- The two hashes are compared. If they match, the file is verified as an exact copy. If they differ, FastCopy flags the file as a verification error in the transfer log.
To enable verification: Check the “Verify” checkbox in the main FastCopy window before starting the transfer. You can also enable it via the command line with the /verify flag.
Verification modes available:
- SHA-256: Cryptographically strong hash. Virtually impossible for corruption to go undetected. Slower but extremely reliable.
- xxHash: Non-cryptographic hash optimized for speed. Excellent for detecting transfer errors with much less CPU overhead than SHA-256.
FastCopy Pro adds an additional layer called “Perfect Verify” which generates exportable hash report files suitable for audit trails and compliance documentation. The standard free version’s verification is already more than sufficient for personal and most professional use.
FastCopy vs TeraCopy – which is better?
Both FastCopy and TeraCopy are popular Windows file copy utilities, but they target slightly different user needs. Here is a direct comparison:
Where FastCopy wins:
- Raw speed: FastCopy is consistently faster in benchmarks, especially when copying large numbers of small files. Its multi-threaded overlapped I/O engine pushes hardware closer to its maximum throughput.
- Command-line automation: FastCopy has a complete CLI with every GUI option available as a flag. TeraCopy’s CLI is more limited.
- No dependencies: FastCopy runs standalone with zero runtime requirements. TeraCopy requires .NET Framework.
- Portable mode: FastCopy works from a USB drive without installation. TeraCopy needs to be installed.
- Completely free: All features are available in the free edition. TeraCopy locks queue management and some features behind a $25 Pro license.
Where TeraCopy wins:
- Pause and resume: TeraCopy has native pause/resume on individual transfers. FastCopy requires re-running with Diff mode to resume.
- Drag-and-drop: TeraCopy integrates as a drag-and-drop handler in Explorer, intercepting copy operations automatically.
- More polished GUI: TeraCopy’s interface is more modern and visually appealing, with progress bars and file-level detail.
- Transfer queue: TeraCopy Pro can queue multiple copy jobs and process them sequentially.
Bottom line: If your priority is maximum speed, scripted backups, and zero bloat, FastCopy is the better choice. If you want a friendlier interface with pause/resume and drag-and-drop, TeraCopy fits better. Many power users keep both installed and use each for different situations.
How do I automate FastCopy backups with the command line?
FastCopy has a full command-line interface (CLI) that mirrors every option available in the GUI. This makes it ideal for automated backup scripts, scheduled tasks, and batch operations.
Basic command syntax:
fastcopy.exe /cmd=diff /verify /auto_close "C:\Source" /to="D:\Destination"
Essential command-line flags:
/cmd=diff– Copy mode. Options:diff(differential),sync(sync with delete),move,delete,noexist_only(copy only new files)/verify– Enable SHA-256 hash verification after copy/auto_close– Automatically close the FastCopy window when the job finishes/log– Write a detailed transfer log to a file/logfile="path"– Specify a custom log file path/include="*.docx;*.xlsx"– Only copy files matching these patterns/exclude="*.tmp;Thumbs.db"– Skip files matching these patterns/speed=full– Run at full speed (options:full,autoslow,9–1for throttling)/acl– Preserve NTFS security ACLs/stream– Preserve NTFS alternate data streams
Example: Nightly backup script
fastcopy.exe /cmd=sync /verify /auto_close /acl /log /logfile="D:\Logs\backup_%date%.log" "C:\Users\YourName\Documents" /to="E:\Backup\Documents"
Scheduling with Windows Task Scheduler: Open Task Scheduler, create a new basic task, set the trigger (daily at 2:00 AM, for example), choose “Start a Program” as the action, enter the FastCopy executable path, and paste your command-line arguments into the “Add arguments” field. The backup will run unattended on schedule.
Does FastCopy work on Windows 11?
Yes, FastCopy 5.11.2 fully supports Windows 11, including the latest 24H2 update. Both the 64-bit and 32-bit editions are compatible, though 64-bit is recommended since all Windows 11 installations run 64-bit.
Windows 11 specific details:
- Shell extension: The right-click context menu integration works with both the legacy context menu and the new Windows 11 compact menu. On the new menu, you may need to click “Show more options” to see the full set of FastCopy entries (Copy, Move, Delete).
- OneDrive fix: Version 5.11.2 specifically resolved a bug where the shell extension could accidentally trigger OneDrive downloads on cloud-only placeholder files when you right-clicked them. This is no longer an issue in the current release.
- Dark mode: FastCopy’s interface respects the Windows system theme. If you have Windows 11 dark mode enabled, the FastCopy window adjusts accordingly.
- ARM64: As of version 5.11.2, FastCopy does not have a native ARM64 build. It runs on Windows on ARM (Snapdragon X, etc.) through x64 emulation, which works but may not achieve peak performance on ARM hardware.
If you are upgrading from an older version, just download and install the new version over the existing installation. Your settings (FastCopy.ini) and job configurations are preserved.
How do I add FastCopy to the right-click context menu?
FastCopy can integrate directly into the Windows right-click (context) menu, allowing you to copy, move, or delete files without opening the FastCopy window first.
If you used the installer: Shell integration is set up automatically during installation. Right-click any file or folder in Windows Explorer and you will see FastCopy options (Copy, Move, Delete, and more) in the context menu.
If you used the portable version:
- Open FastCopy.exe
- Go to Help > Shell Extension Install
- Click Install
- You may need to restart Windows Explorer or log out/in for the changes to take effect
Customizing shell extension options: Go to Edit > Settings > Shell Extension tab. Here you can configure which operations appear in the context menu (Copy, Move, Paste, Delete), enable drag-and-drop menu integration, choose whether to show icons in the menu, and set the default copy mode for right-click operations.
To remove: Open FastCopy, go to Help > Shell Extension Uninstall, and click Uninstall. This cleanly removes all context menu entries.
Can FastCopy resume interrupted file transfers?
FastCopy does not have a built-in pause/resume button like TeraCopy. However, you can effectively resume interrupted transfers using the Diff (size/date) copy mode, which is often more reliable than a traditional pause/resume approach.
How to resume an interrupted transfer:
- After the interruption (power outage, network drop, manual cancel, or system crash), simply re-open FastCopy
- Set the same source and destination paths as the original job
- Select “Diff (size/date)” from the copy mode dropdown
- Click Execute
FastCopy will scan both the source and destination, compare each file by size and last-modified date, skip all files that already match, and only copy the files that are missing or incomplete. This takes a few seconds for the comparison scan and then resumes exactly where the transfer left off.
Why this works well: A partially copied file will have a different size than the source, so FastCopy will re-copy it from scratch. Fully copied files will match and get skipped. The result is the same as a pause/resume, just done through a re-scan rather than a persistent state file.
Pro tip: For very large transfers over unreliable connections (such as network drives over WiFi), always use Diff mode from the start. This way, if anything goes wrong, you can just re-run the same command and it picks up automatically.
Does FastCopy support network drives and NAS devices?
Yes, FastCopy fully supports network drives, NAS devices, and any storage accessible through Windows file sharing (SMB/CIFS protocol). You can use both mapped drive letters and UNC paths.
How to use network paths:
- Mapped drives: If your NAS is mapped as
Z:\, just useZ:\SharedFolderas the source or destination - UNC paths: Use the full network path directly, such as
\\NAS01\SharedFolder\Backupsor\\192.168.1.50\Data
Performance considerations:
- Network transfer speed is limited by your network connection, not by FastCopy itself. A 1 Gbps Ethernet link maxes out at approximately 125 MB/s. FastCopy on a 10 Gbps link has been benchmarked at close to 10 Gbps throughput.
- Use “Diff (size/date)” mode for NAS backups. This avoids re-copying unchanged files over the network, saving significant time on subsequent backup runs.
- If your NAS supports SMB3 multichannel, FastCopy’s multi-threaded I/O can take advantage of multiple network paths automatically.
- For WiFi connections, consider using the
/speed=autoslowflag to prevent FastCopy from saturating your wireless bandwidth and causing other devices to lag.
Common NAS brands tested: FastCopy works reliably with Synology, QNAP, TrueNAS, Western Digital My Cloud, and Windows-based file servers. Any device that supports standard SMB/CIFS file sharing will work.
FastCopy vs Robocopy – which should I use?
Robocopy (Robust File Copy) ships with Windows and is a powerful command-line file replication tool. FastCopy provides both a GUI and CLI. Here is how they compare:
Where FastCopy wins:
- Speed on local transfers: FastCopy’s multi-threaded overlapped I/O is faster for disk-to-disk copies, especially with many small files
- Visual interface: FastCopy has a GUI. Robocopy is command-line only (unless you use a third-party wrapper).
- Hash verification: FastCopy has built-in SHA-256/xxHash verification. Robocopy has no native verify option.
- Simpler syntax: FastCopy’s CLI flags are more intuitive for common operations
Where Robocopy wins:
- Built into Windows: No download or installation needed. Available on every Windows machine since Vista.
- Per-file retry logic: Robocopy’s
/R:3 /W:5flags automatically retry failed files with configurable wait times. Essential for flaky network connections. - Bandwidth throttling: The
/IPG(inter-packet gap) flag lets you throttle network bandwidth precisely. - Multi-threaded network copies: Robocopy’s
/MT:16flag creates multiple copy threads specifically optimized for network replication. - Mirror mode: Robocopy’s
/MIRcreates exact mirror copies including deleting files at the destination that no longer exist at the source, with extensive logging. - Active Directory integration: Better handling of domain-level NTFS permissions and security descriptors in enterprise environments.
Recommendation: Use FastCopy for local disk-to-disk transfers, personal backups, and any job where you want a visual interface or hash verification. Use Robocopy for server-to-server network replication, domain migrations, and scenarios where retry logic and bandwidth throttling are important. Many IT professionals use both tools depending on the situation.
How to use FastCopy for differential and sync backups?
FastCopy offers several copy modes that make it an effective backup tool. Understanding the differences between them helps you choose the right approach for your backup strategy.
Available backup modes:
- Diff (No Overwrite): Copies only files that do not exist at the destination. Never overwrites existing files, even if the source is newer. Good for accumulating files without risk of overwriting.
- Diff (Size/Date): Compares each file by size and last-modified timestamp. Copies only files that are new or have changed. This is the most common mode for incremental backups.
- Diff (Newer): Only copies files where the source has a newer timestamp than the destination. Ignores size differences.
- Sync (Size/Date): Same as Diff, but also deletes files at the destination that no longer exist at the source. This creates an exact mirror. Use with caution.
- Copy (Overwrite All): Copies everything regardless of whether files already exist. Full backup every time. Slowest but simplest.
Recommended backup setup:
- Set copy mode to “Diff (Size/Date)”
- Enable Verify to hash-check every copied file
- Set your source folder (e.g.,
C:\Users\YourName\Documents) - Set your destination folder (e.g.,
E:\Backup\Documents) - Click Execute for the first full backup
- On subsequent runs with the same settings, only changed files are copied
Automation tip: Save this as a Job in FastCopy (File > Job Register) and then schedule it with Windows Task Scheduler using the /cmd=diff /verify /auto_close flags. This gives you hands-free daily incremental backups with hash verification.
How to fix FastCopy not working, crashing, or not starting?
If FastCopy crashes on launch, freezes during transfers, or fails to start at all, work through these troubleshooting steps in order:
Step 1: Update to the latest version
Download version 5.11.2 from our download section. Older versions may have bugs that have been fixed in newer releases. Install over the existing version; your settings will be preserved.
Step 2: Fix shell extension crashes
If Windows Explorer crashes or freezes when you right-click files, the FastCopy shell extension may be the cause. Open FastCopy, go to Help > Shell Extension Uninstall, restart Explorer (or log out and back in), and then re-install the extension via Help > Shell Extension Install.
Step 3: Run as administrator
If FastCopy shows “Access Denied” errors when copying to system folders (C:\Program Files, C:\Windows), right-click FastCopy.exe and select “Run as administrator.” This grants the permissions needed for protected directories.
Step 4: Reduce the buffer size
Go to Edit > Settings > I/O Settings and reduce the Buffer Size. The default is often 256 MB, which can cause memory pressure on systems with 4 GB or less total RAM. Try 64 MB or 128 MB and see if stability improves.
Step 5: Reset settings to defaults
Close FastCopy. Navigate to the installation directory (typically C:\Program Files\FastCopy) and delete the FastCopy.ini file. Relaunch FastCopy and it will start with factory defaults. This fixes issues caused by corrupted or incompatible settings from older versions.
Step 6: Try the portable version
Download the portable ZIP from our download section, extract it to a new folder, and run it. If the portable version works but the installed version does not, the problem is likely a corrupted shell extension registration or a conflict with another application.
Is FastCopy open source?
FastCopy has a nuanced licensing history. In earlier versions (roughly pre-2017), the software was distributed under a permissive BSD-style open-source license, and the full source code was freely available for modification and redistribution.
More recent versions are distributed as freeware with source code available. The developer, Shirouzu Hiroaki, continues to publish the source code on the official website for transparency and community review. However, the license terms have changed: commercial redistribution without permission is no longer allowed, and the Pro version’s additional features are proprietary.
What this means in practice:
- You can download and use FastCopy for free with all features
- The source code is available for inspection and learning
- You cannot fork the code and redistribute a modified version commercially
- Technically it is “source-available freeware” rather than open source in the OSI-approved sense
For users who care about transparency and trust, the source availability means you (or a security researcher) can inspect exactly what FastCopy does. This is more than most freeware offers.
How to schedule automatic FastCopy backups with Task Scheduler?
Combining FastCopy’s command-line interface with Windows Task Scheduler creates a reliable automated backup system that runs without any manual intervention. Here is the complete setup process:
Step 1: Build your FastCopy command
Test the command manually first to make sure it works:
"C:\Program Files\FastCopy\FastCopy.exe" /cmd=sync /verify /auto_close /log /logfile="D:\Logs\backup_%date:~-4%-%date:~4,2%-%date:~7,2%.log" "C:\Users\YourName\Documents" /to="E:\Backup\Documents"
Step 2: Open Task Scheduler
Press Win+S, search for “Task Scheduler,” and open it. Click “Create Basic Task” in the right-side panel.
Step 3: Configure the task
- Name: “FastCopy Nightly Backup” (or whatever describes your job)
- Trigger: Daily at 2:00 AM (or your preferred time when the computer is on but not heavily used)
- Action: Start a Program
- Program:
"C:\Program Files\FastCopy\FastCopy.exe" - Arguments:
/cmd=sync /verify /auto_close /log "C:\Users\YourName\Documents" /to="E:\Backup\Documents"
Step 4: Advanced settings (optional)
In the task properties, go to the “Settings” tab and enable “Run task as soon as possible after a scheduled start is missed.” This ensures the backup runs even if the computer was asleep at the scheduled time. Also consider checking “Stop the task if it runs longer than 4 hours” as a safety timeout.
Pro tip: Use FastCopy’s Job Register feature (File > Job Register) to save your backup configuration with a name. Then use /job="JobName" in the command line instead of typing all the paths and flags. This keeps the Task Scheduler entry clean and makes it easy to modify the backup scope later.
Where is the official download for FastCopy?
The official download source for FastCopy is the developer’s own website at fastcopy.jp, maintained directly by Shirouzu Hiroaki. This is the only source guaranteed to have the latest, unmodified version of the software.
You can also download FastCopy from our download section above, which links directly to the official release files hosted on the developer’s server.
Trusted mirror sites:
- Softpedia – Verified clean, carries the “100% Free” award badge
- MajorGeeks – Long-standing trusted download site, mirrors the official installer
- AlternativeTo – Links to the official download page
Sites to avoid: Be cautious of random download aggregator sites that may repackage FastCopy with bundled adware, toolbars, or modified installers. If the download file is significantly larger than ~5 MB, or if the installer asks you to install additional software, you are likely not using the official package. Stick to the sources listed above.
How to verify your download: The official FastCopy website publishes SHA-256 checksums for each release. After downloading, you can verify the file integrity by running certutil -hashfile FastCopy5112_installer.exe SHA256 in Command Prompt and comparing the output to the published hash.
How to completely uninstall FastCopy from Windows?
FastCopy is one of the cleanest Windows applications to uninstall because it leaves virtually no traces behind. The process depends on whether you used the installer or portable version.
Uninstalling the installed version:
- Remove the shell extension first: Open FastCopy, go to Help > Shell Extension Uninstall, and click Uninstall. This removes the right-click context menu entries and the associated DLL registration.
- Uninstall via Windows: Go to Settings > Apps > Installed Apps (Windows 11) or Control Panel > Programs and Features (Windows 10). Find FastCopy in the list and click Uninstall.
- Verify removal: The installation directory (typically
C:\Program Files\FastCopy) should be removed automatically. If any files remain, you can safely delete the folder manually.
Removing the portable version:
- If you installed the shell extension from portable mode, open FastCopy first and uninstall it via Help > Shell Extension Uninstall
- Close FastCopy
- Delete the entire portable folder. That is it.
The portable version stores all settings in a FastCopy.ini file in the same directory as the executable. It makes no changes to the Windows registry and leaves no files elsewhere on the system. Deleting the folder removes everything completely.
Does FastCopy work offline without an internet connection?
Yes, FastCopy works entirely offline. It makes zero network connections and does not require internet access for any of its features, including downloading, installing, running, and updating.
What works offline:
- All copy, move, sync, and delete operations
- Hash verification (SHA-256, xxHash)
- Command-line automation
- Shell extension (right-click menu)
- Job management and scheduling
- All settings and configuration
FastCopy does not have an auto-update feature. To update to a new version, you need to manually download the installer from the official site. This is by design; the developer prioritizes minimal footprint and no background processes.
This offline-first approach makes FastCopy especially useful in air-gapped environments (computers intentionally disconnected from the internet for security), data centers with restricted network access, and field work where internet is unavailable.